Proper Heat Cable Installation: Keeping Your Roof Safe in Winter
When winter arrives, ice dams and snow buildup can pose serious risks to your roof and home. One effective solution to prevent these issues is the installation of heat cables. However, improper installation can lead to inefficiency, increased energy costs, or even damage to your roof.
For over a decade, Rescue My Roof has been a leader in the roofing industry. We’ve helped thousands of homeowners achieve their perfect roofing solutions. We’re here to help you, too.
In this article, we’ll cover correct heating cable installation and how to maximize their effectiveness. Ultimately, you’ll be able to protect your home during the colder months.
What Are Heat Cables?

Heat cables, also known as heat tape or de-icing cables, are electrical cables designed to generate heat. They are installed along the edges of your roof and gutters to melt snow and ice, preventing ice dams from forming.
By creating a clear drainage path for melted snow, heat cables protect your roof from water damage and structural issues.
Benefits of Proper Heat Cable Installation
Prevents Ice Dams: Melts snow before it refreezes, reducing the risk of ice dams.
Minimizes Water Damage: Prevents water from backing up under shingles and into your home.
Protects Gutters: Reduces the weight of ice in your gutters, preventing sagging or breakage.
Energy Efficiency: Proper placement ensures cables only heat necessary areas, saving energy.
6 Steps for Proper Heat Cable Installation
Installing heat cables is a smart way to protect your roof and gutters during the winter months. These cables help prevent ice dams and ensure proper drainage, reducing the risk of costly damage to your home.
However, proper installation is crucial for them to work effectively and safely. Here are six tips that will set you up for success:
1. Assess Your Roof’s Needs
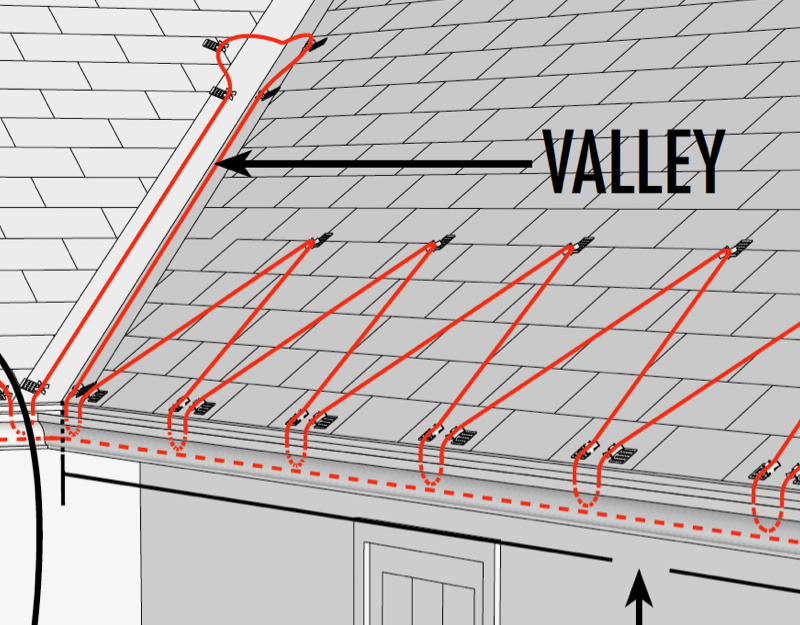
To assess your roof’s needs, you’ll need to determine the areas most prone to ice dam formation, such as roof edges, valleys, and eaves.
Afterward, measure the length of cables required based on the size and shape of your roof and gutter system. This ensures you’ll have enough material to cover the necessary areas.
2. Choose the Right Type of Heat Cable
There are a few different types of heating cables, but we recommend using self-regulating heat cables, which adjust their heat output based on the ambient temperature.
Avoid cheap, constant-wattage cables that may overheat or fail to function in extreme cold. The other options may be slightly more expensive, but they’ll provide better results.
3. Install on a Dry, Clean Roof
Ensure your roof and gutters are clean and dry before installation to secure proper adhesion and prevent damage. If you fail to have the ideal conditions, the heating cables may not properly stick to your roof, inhibiting their functionality.
4. Position the Heat Cables Correctly

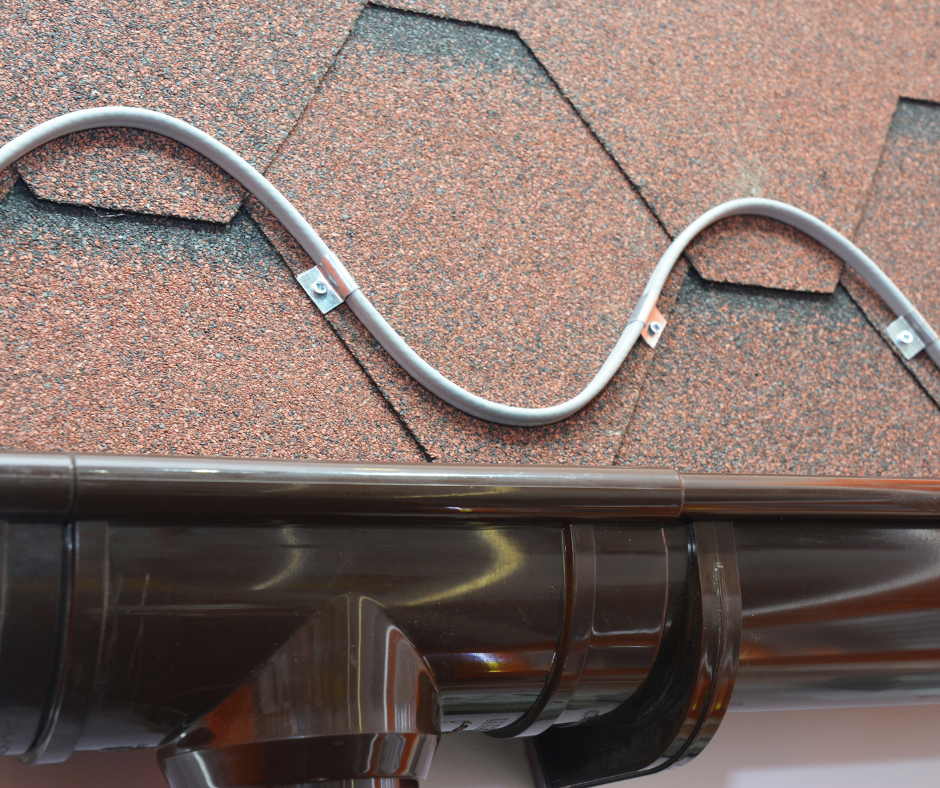
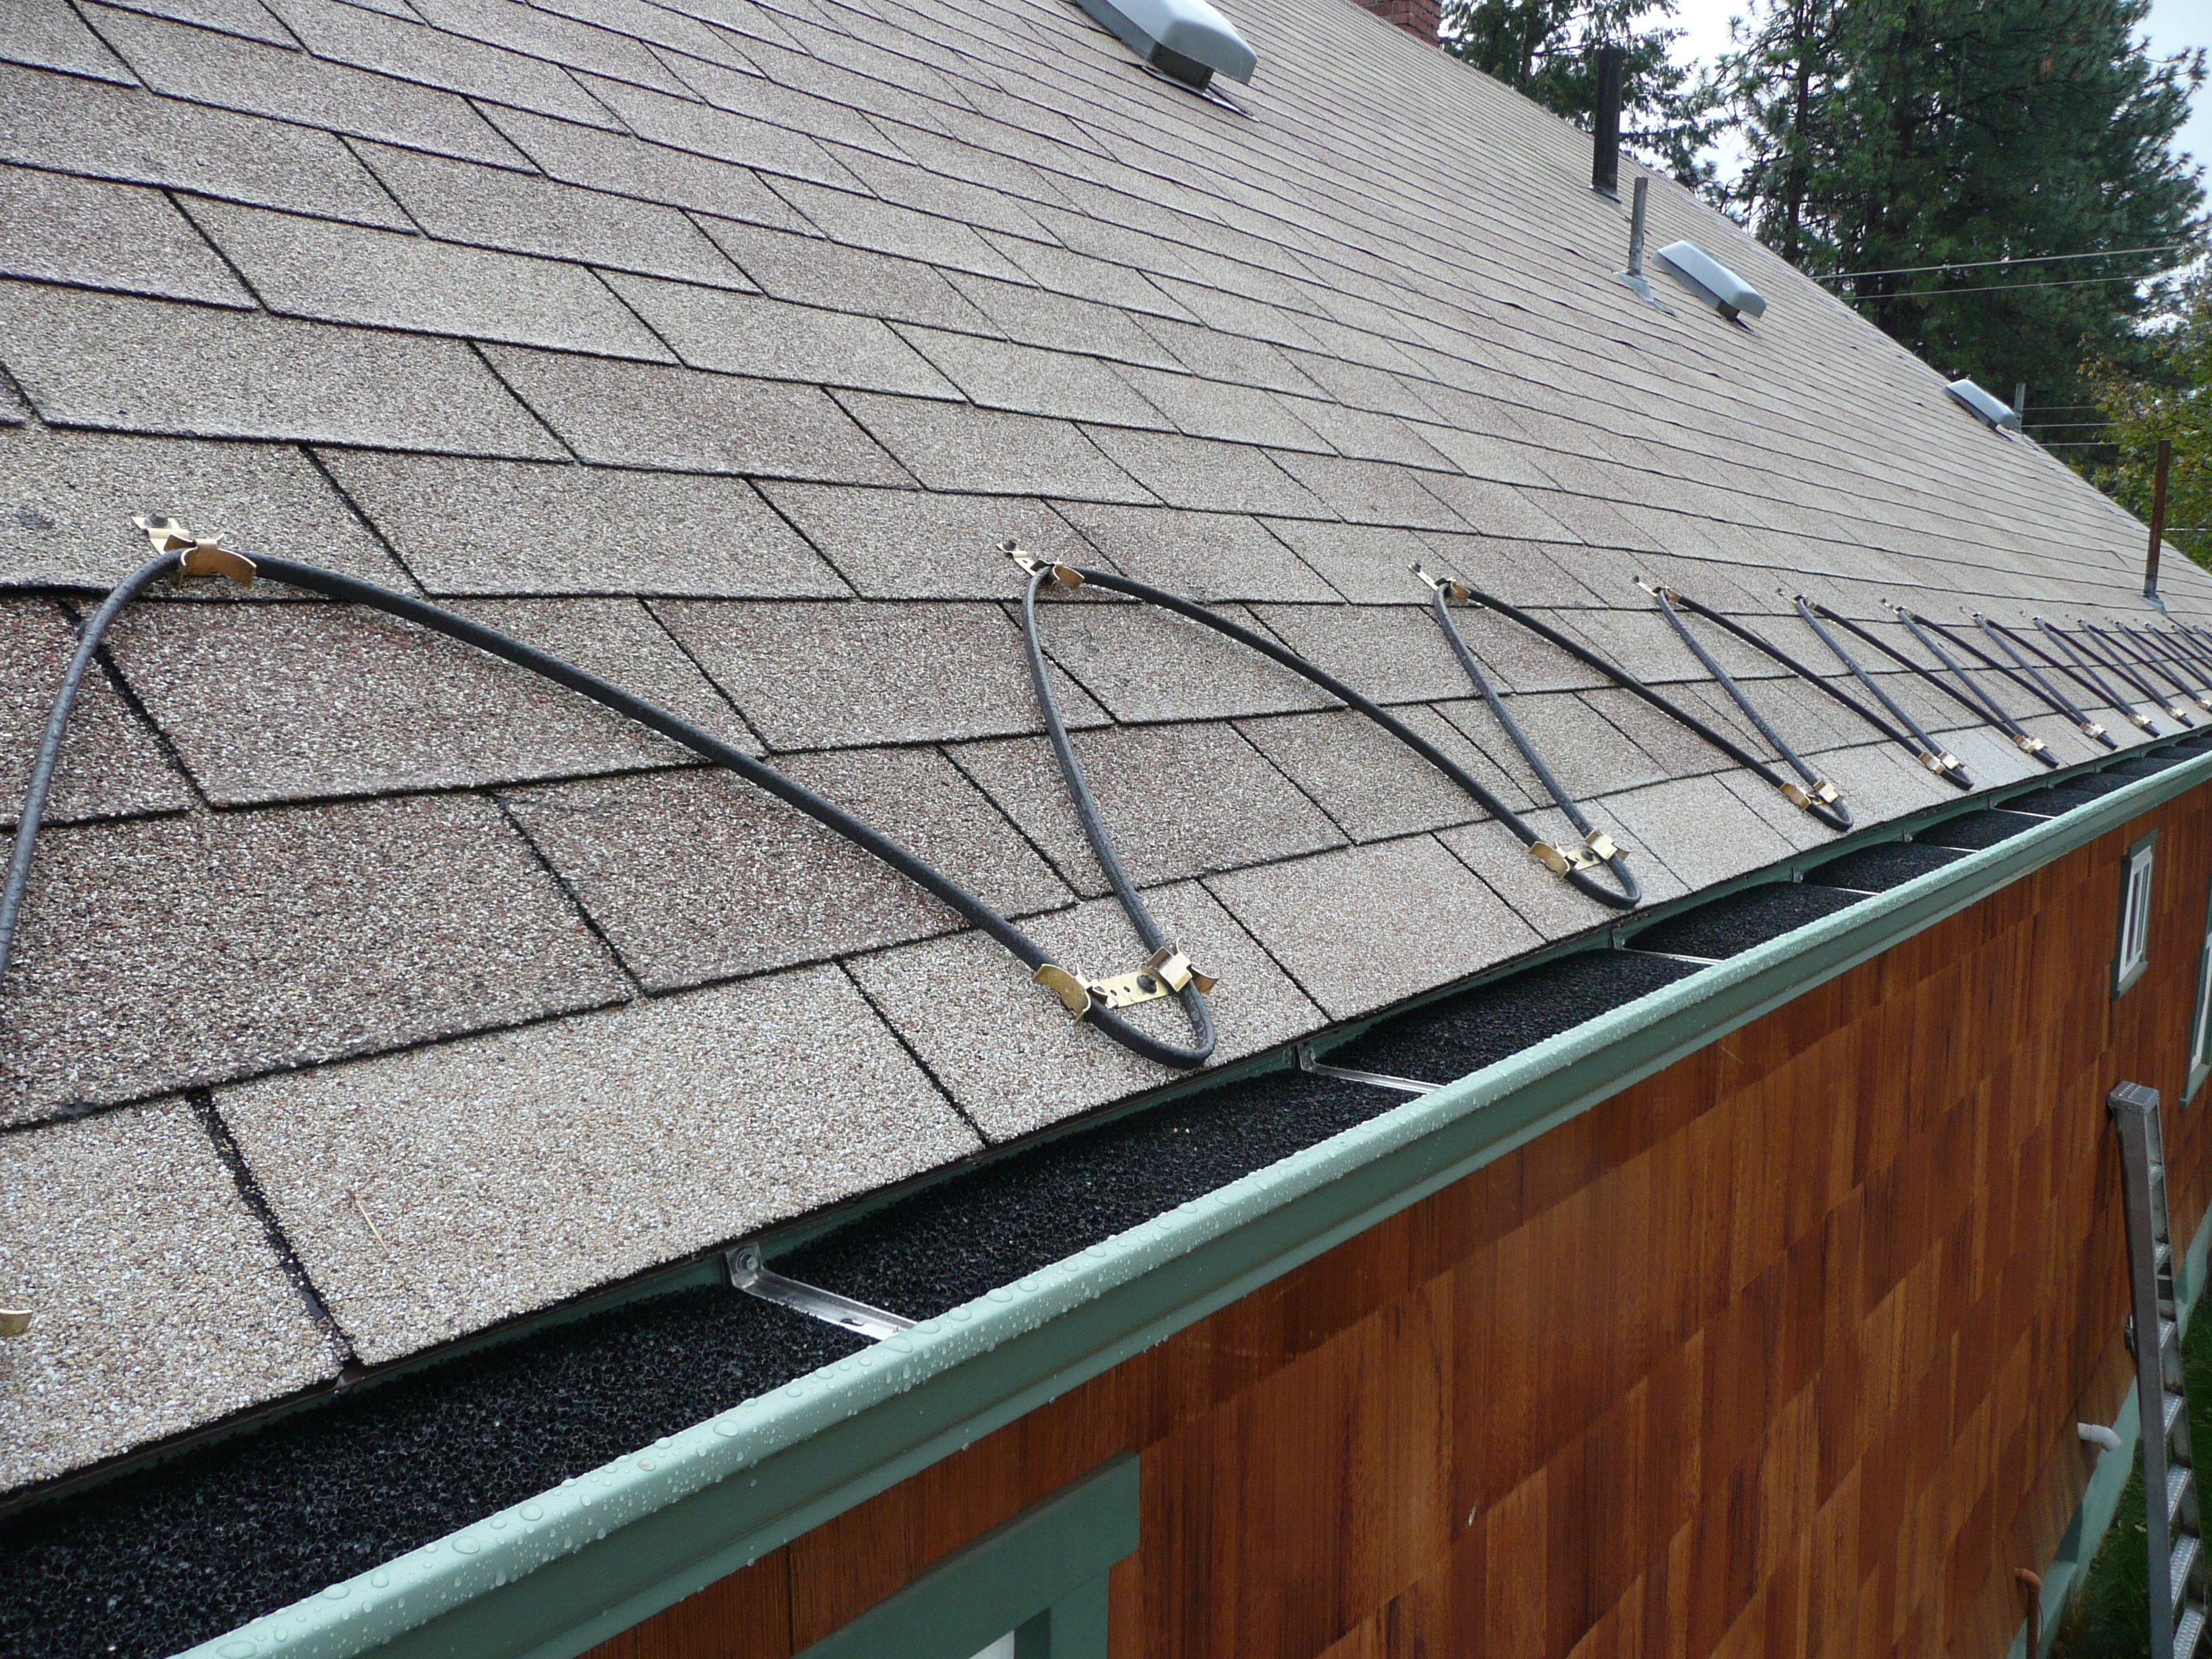
Lay the cables in a zigzag pattern along the roof edge to create a channel for melting snow, extending the cables into the gutters and downspouts to keep water flowing.
Failing to properly place the heating cables may cause ineffective ice dam prevention, damage to roofing materials, or even risk of fire.
To avoid these issues, ensure that the heat cables are correctly placed, securely fastened, and only used in the necessary areas of your roof and gutters. Professional installation can help mitigate these risks and provide better results.
5. Secure the Cables

To securely fasten the cables, use clips or fasteners designed for heat cables to avoid damaging shingles or gutters.
Never use staples or nails, as they can puncture the cable and compromise functionality.
6. Test the System
Plug in the cables and test for proper heat output before the first snowfall. Additionally, inspect connections to ensure they’re secure and free from moisture.
If your heating cables are not putting off heat or you’re worried the connections are not water tight, contact a professional.
Common Mistakes to Avoid
- Improper Placement: Installing cables too far up the roof or not extending them into gutters.
- Using the Wrong Type of Cable: Opting for non-self-regulating cables that may overheat.
- Neglecting Inspections: Failing to check cables periodically for wear, damage, or improper function.
- DIY Installation Without Experience: Incorrect installation can lead to inefficiency or damage to your roof.
Maintenance Tips for Heat Cables
- Inspect cables annually for wear, damage, or loose connections.
- Clean gutters and downspouts to ensure melted water can drain properly.
- Replace damaged cables immediately to maintain effectiveness.
Should You Hire a Professional?
While installing heat cables can be a DIY project for experienced homeowners, hiring a professional ensures proper placement and secure installation.
A roofing expert can also identify additional measures, like improving attic insulation, to complement your heat cable system and prevent ice dams more effectively.
Installing Heating Cables
Heat cables are a valuable tool for protecting your roof during winter, but proper installation is key to their success. By following these guidelines or enlisting professional help, you can enjoy a safer, more efficient solution to winter roof maintenance. With the right preparation, you’ll keep your roof—and your home—protected all season long.
Learn more with “The Advantages and Disadvantages of Using Heating Cables” and “Ice Dams: How to Prevent and Protect Your Roof and Home.”
Are you worried about ice dams and snow build-up this winter? Rescue My Roof can help you achieve roofing solutions to prevent winter roofing issues. Contact us today to get a free estimate.


